 Save
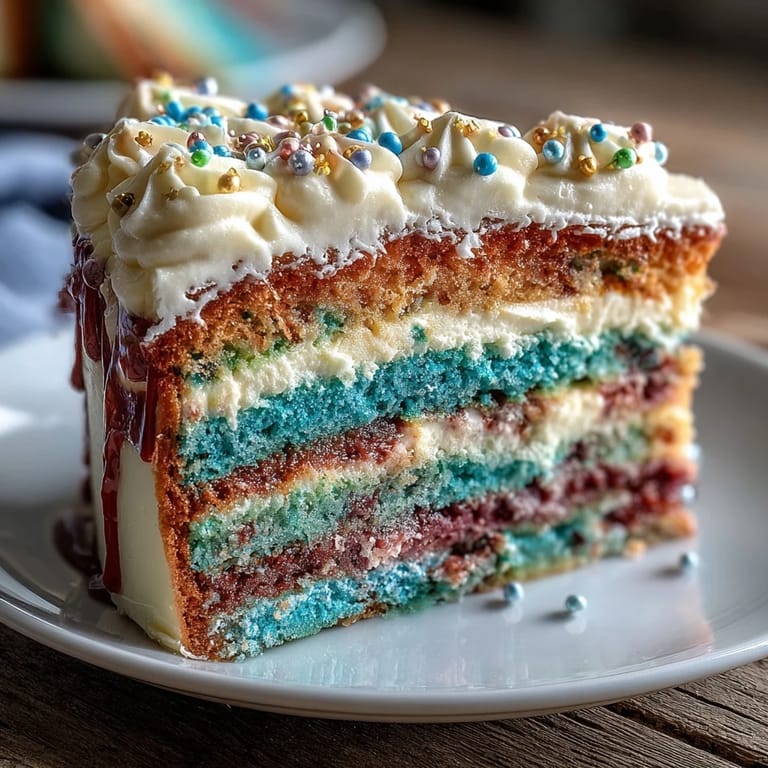
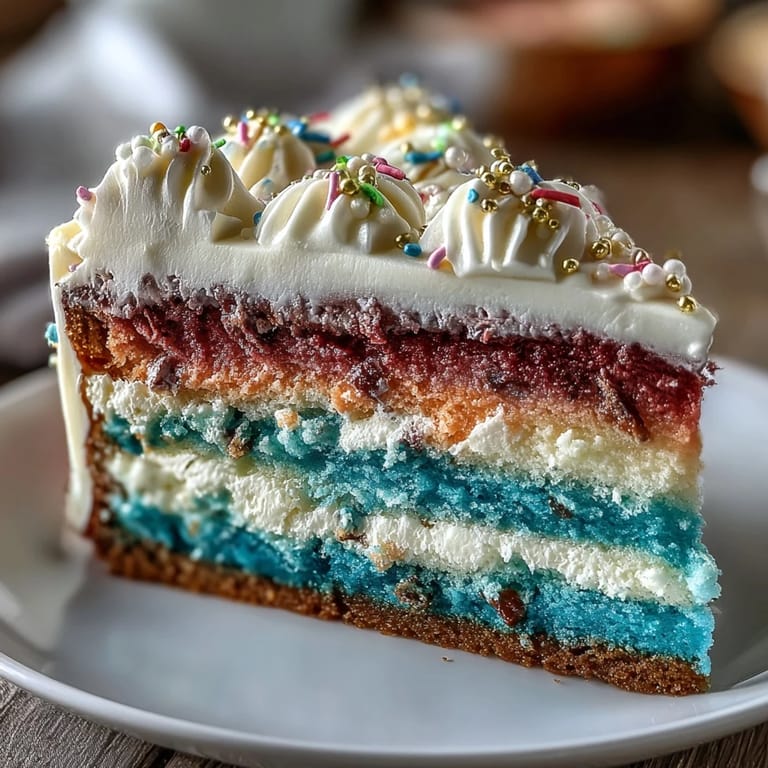
Save My cousin texted me three months before her graduation asking if I could make her cake, and honestly, I panicked a little. But then she sent a photo of her school colors—this gorgeous deep blue fading to soft lavender—and suddenly I could see it: four layers of cake, each one a shade lighter than the last, stacked like a sunset in reverse. That's when I knew this ombre cake wasn't just dessert; it was going to be the centerpiece of her celebration, the thing people would photograph and remember.
I'll never forget standing in my kitchen at 6 a.m. on graduation day, four cake pans lined up like soldiers, watching the batter transform from pale vanilla to deep jewel tones as I added drops of gel coloring. My roommate stumbled in half asleep, saw the rainbow of batters, and just said, 'Oh, that's what you were so stressed about?' Sometimes the scariest things in the kitchen turn out to be the most beautiful.
Ingredients
- All-purpose flour: Use 400 grams by weight for accuracy; scooping can pack flour and throw off your ratios, making the cake dense.
- Baking powder: Fresh baking powder matters more than you'd think—replace if it's been open for over six months or your cake won't rise properly.
- Unsalted butter: Softened but not melting; you want it to be the texture of soft clay so it creams properly with the sugar.
- Granulated sugar: This is your leavening agent as much as your sweetener, so don't skip the creaming step.
- Eggs: Room temperature eggs incorporate more smoothly and create a more tender crumb—take them out 30 minutes before baking.
- Vanilla extract: Real vanilla makes a noticeable difference in flavor depth compared to imitation.
- Whole milk: Room temperature milk prevents shocking the batter and helps it mix evenly.
- Gel food coloring: Gel holds its vibrancy better than liquid coloring and won't thin out your batter, which is crucial for an ombre effect.
- Egg whites: Fresh, cold, and completely free of any yolk or grease on your bowl—one tiny speck of fat and your meringue won't whip.
- Unsalted butter for frosting: Softened and cubed, at around 65 to 68 degrees Fahrenheit—too warm and it breaks, too cold and it won't incorporate smoothly.
Tired of Takeout? 🥡
Get 10 meals you can make faster than delivery arrives. Seriously.
One email. No spam. Unsubscribe anytime.
Instructions
- Get your mise en place ready:
- Preheat your oven to 350°F and prepare four 8-inch round pans with parchment paper; this detail keeps you from scrambling later when your batter is waiting. Having everything measured and at the right temperature is the difference between a smooth bake and a stressful one.
- Make your dry mix:
- Whisk flour, baking powder, and salt together in a medium bowl—this distributes the leavening evenly so your cake rises uniformly. Set it aside.
- Cream butter and sugar until it transforms:
- Beat them together for about three to four minutes until the mixture is pale and fluffy, almost like pale mousse. You're incorporating air into the butter, which helps your cake rise and gives it structure.
- Add eggs one at a time, letting each one fully disappear:
- Add an egg, mix until combined, then add the next; this builds emulsion and keeps your batter smooth. If your batter looks broken or curdled, don't panic—it'll come back together when you add the flour.
- Stir in vanilla and begin alternating:
- Start with the flour mixture, then milk, then flour again, always ending with flour to seal in the wet ingredients. Mix on low until just combined; overmixing develops gluten and makes the cake tough.
- Divide and tint your batter for the ombre effect:
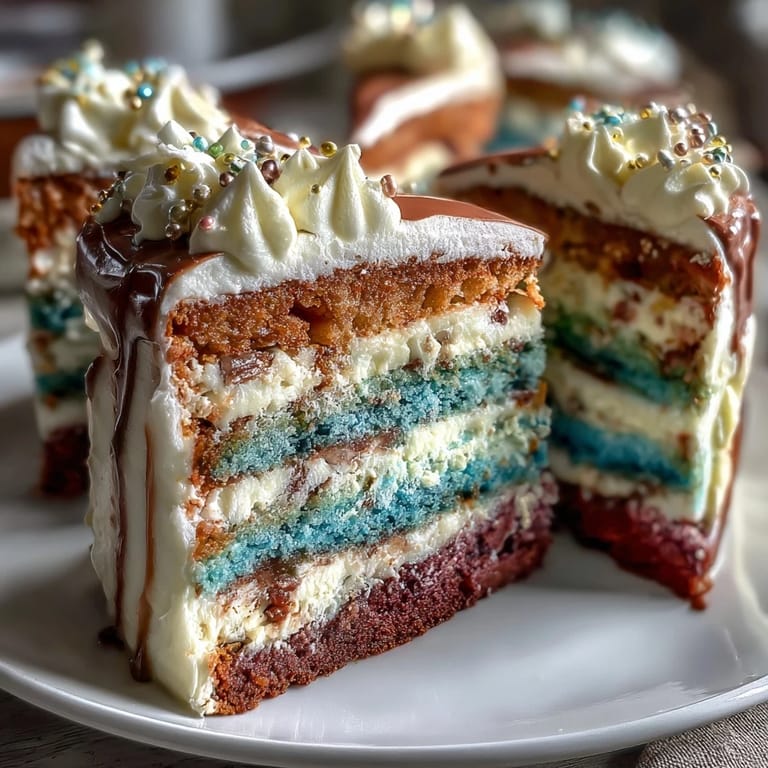
- Split the batter into four equal bowls and add increasing drops of gel coloring to each one, stirring gently until the color is even. The darkest color goes in the first bowl, the lightest in the fourth—you're creating a gradient that will stack beautifully.
- Pour, smooth, and into the oven:
- Distribute each colored batter into its prepared pan and smooth the tops with an offset spatula so they bake evenly. Bake for 22 to 25 minutes until a toothpick comes out clean or with just a few crumbs clinging to it.
- Cool with patience:
- Let cakes rest in their pans for ten minutes—this sets the structure so they don't fall apart when you turn them out. Transfer to wire racks and cool completely before frosting; warm cake and frosting are a disaster waiting to happen.
- Make your Swiss meringue buttercream over a water bath:
- Combine egg whites and sugar in a heatproof bowl over simmering water and whisk constantly until the mixture reaches 160°F and the sugar dissolves completely. You'll feel the graininess disappear under your whisk—that's when you know you're ready to move to the mixer.
- Whip until clouds form:
- Transfer to your mixer and whip on high speed until stiff peaks form and the bowl is cool to the touch, about ten minutes. This creates a stable, airy frosting that's light enough to taste luxurious.
- Add butter gradually, cube by cube:
- Add butter a few cubes at a time, mixing well after each addition; rushing this step causes the buttercream to break. If it looks curdled, keep mixing or warm it slightly—it'll come together.
- Tint your frosting for color coordination:
- Divide the buttercream into bowls and tint portions to match or complement your cake layers; you can create an ombre frosting or keep it simple. Remember that colors deepen slightly as they sit, so go slightly lighter than you think you need.
- Level and layer with care:
- Trim any domed tops from your cake layers if needed—a serrated knife works best. Place your darkest layer on a cake stand, spread a generous layer of buttercream on top, and repeat until all layers are stacked, finishing with the lightest color on top.
- Apply the crumb coat and chill:
- Spread a thin, even layer of frosting over the entire cake to seal in crumbs, then refrigerate for twenty minutes. This extra step means your final frosting layer goes on clean and smooth.
- Frost and finish with intention:
- Apply your final frosting layer, blending colors for an ombre effect if desired, and decorate with pearls, toppers, or piped details. Chill until set, then bring to room temperature for about thirty minutes before serving so the flavors and textures shine.
 Save
Save When my cousin saw the finished cake sitting on the dessert table, she actually teared up—not because of me, but because it represented something she'd worked toward for four years. That's when I realized that baking isn't just about flavor or technique; sometimes it's about creating a moment that someone will remember forever.
The Ombre Magic Explained
The ombre effect works because of how you divide and tint the batter—each layer gets progressively lighter, creating a visual gradient when stacked. The trick is using gel coloring in measured drops; I learned to add one drop to the first bowl, two to the second, three to the third, and nothing to the fourth, which keeps the progression smooth and intentional. If your gradient doesn't look dramatic enough once baked, you can always deepen it with your frosting colors, which is a forgiving way to adjust the final look.
Why Swiss Meringue Buttercream Wins
American buttercream is quick, but Swiss meringue buttercream is elegant—it's silky, stable enough to hold decorative piping, and it doesn't taste like pure sugar coating your mouth. The heat-treated egg whites mean you're also safe from any food safety concerns, and the texture is so luxurious that people eat the frosting like it's the star of the show. Once I made this frosting, I never went back to the powdered sugar version for anything fancy.
Timing and Preparation Notes
This cake takes time, but it's forgiving time—you can bake the layers a day ahead, cool them completely, wrap them in plastic, and stack them the next day when you're fresh. The buttercream can also be made ahead and refrigerated for up to three days, then brought to room temperature and re-whipped slightly if it's too stiff. I usually do the baking the day before, the frosting the morning of the celebration, and the decorating a few hours before guests arrive so I'm not stressed when people start showing up.
- Gel coloring doesn't separate or settle like liquid food coloring, so your colors stay true throughout baking and frosting.
- A bench scraper or offset spatula is your best friend for smoothing frosting evenly and creating clean ombre blending.
- Bringing the finished cake to room temperature before serving unlocks the full flavor and makes the frosting taste less dense.
 Save
Save This cake is worth the effort because it tastes as good as it looks, and it becomes a centerpiece that people remember long after the last crumb is gone. Make it for someone you love, and watch their face light up when they see those perfect layers of color.
Recipe FAQs
- → How do I achieve the ombre effect in the cake layers?
Divide the batter into multiple bowls and tint each with increasingly stronger amounts of gel food coloring before baking to create a seamless gradient.
- → What is Swiss meringue buttercream and why is it used here?
Swiss meringue buttercream is a silky, smooth frosting made by whipping egg whites and sugar over heat before adding butter. It provides a light texture and is ideal for smooth, vibrant finishes like this layer cake.
- → Can I prepare the cake layers in advance?
Yes, the cake layers can be baked ahead and stored wrapped in the refrigerator or freezer. Assemble with buttercream when ready to serve for best texture.
- → What tools are essential for making this layered cake?
You'll need four 8-inch round pans, mixing bowls, a stand or hand mixer, an offset spatula, and piping bags with decorative tips to achieve smooth frosting and details.
- → How can I intensify the cake colors safely?
Using gel food coloring is recommended as it doesn't affect batter consistency and lends vibrant shades. For a chocolate variant, add cocoa powder progressively to each layer.