 Save
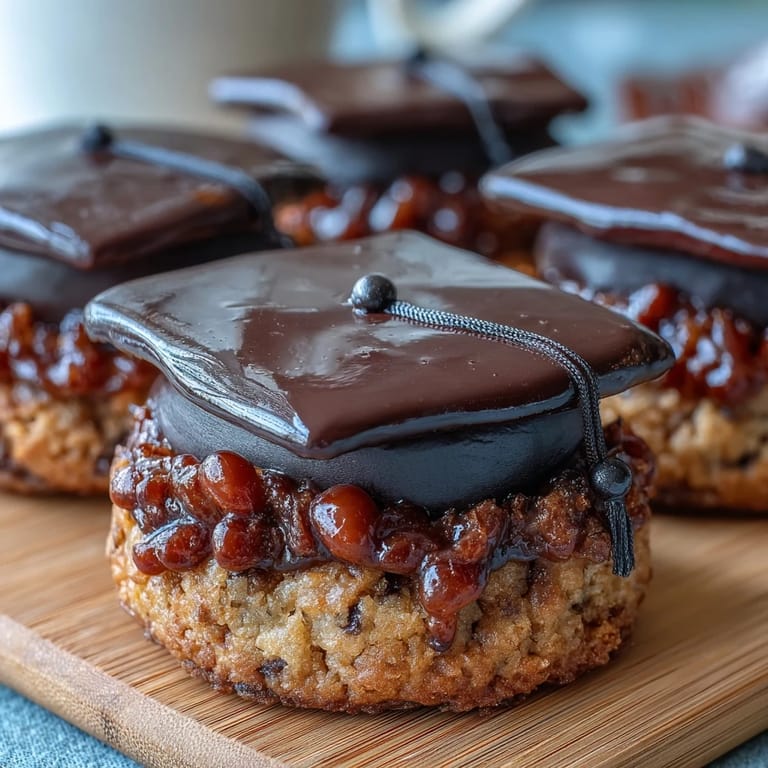
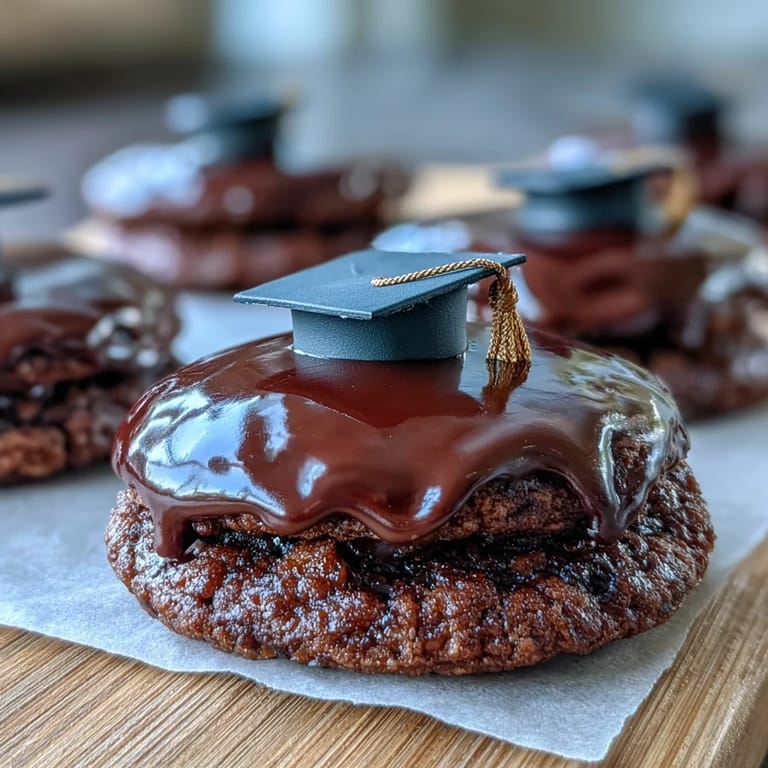
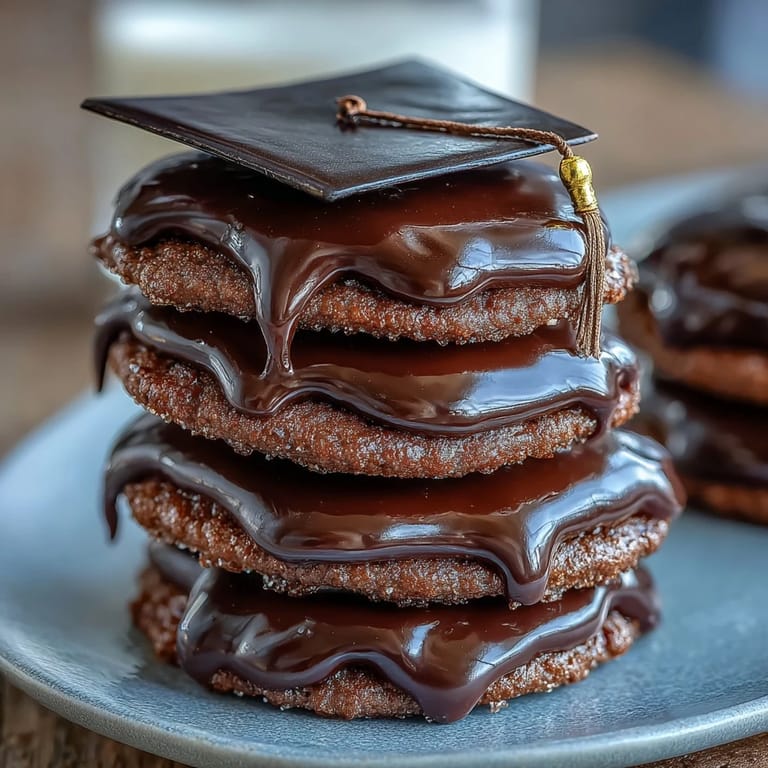
Save My cousin texted me three weeks before her graduation asking if I could make something special for her party, something that screamed celebration. I'd never decorated cookies before, but the idea of edible graduation caps felt perfect—a small, personal touch that would sit on every table. That afternoon, I found myself standing in my kitchen covered in flour, wondering if royal icing would actually behave, and honestly, it was the best kind of kitchen mess to be in.
Watching my cousin's face light up when she saw the cookies arranged on a tiered stand was worth every minute spent piping tiny tassels. Her friends immediately grabbed them, and someone asked if they were store-bought because they looked too polished. That question alone made me realize how much love you can pack into something as simple as a decorated cookie.
Ingredients
- All-purpose flour: The foundation that keeps these cookies crisp and snappy, not cakey or too tender.
- Unsalted butter: Use softened butter so it creams properly with sugar, creating that light, airy texture that melts on your tongue.
- Granulated sugar: This sweetness is what makes the dough feel right in your hands when you're rolling it out.
- Egg and vanilla: The egg binds everything while vanilla whispers flavor in the background, making you wonder what makes these taste so good.
- Powdered sugar: Sift it before using, always, or you'll have lumps in your icing that refuse to cooperate.
- Egg whites or meringue powder: This is what transforms sugar into glossy, pipeable frosting that hardens with structure.
- Gel food coloring: Gel holds its color better than liquid and won't thin your icing like water-based versions do.
- Mini M&Ms or candy pearls: These tiny tassels are what make people smile when they bite into the cap, the little surprise at the end.
Tired of Takeout? 🥡
Get 10 meals you can make faster than delivery arrives. Seriously.
One email. No spam. Unsubscribe anytime.
Instructions
- Mix the dry ingredients:
- Whisk flour, baking powder, and salt together in a bowl, letting them get to know each other. This ensures even leavening throughout your cookies.
- Cream butter and sugar:
- Beat them together until the mixture looks pale and fluffy, about 2 to 3 minutes of beating. You'll notice the sound changes and the color lifts, which means air is being incorporated.
- Add the egg and vanilla:
- Mix these in until completely combined and the dough looks smooth. This is where the dough starts smelling like something worth eating.
- Bring the dough together:
- Gradually add the flour mixture, stirring just until no flour streaks remain. Overmixing will make tough cookies, so be gentle and patient.
- Chill the dough:
- Shape into two disks, wrap them, and refrigerate for 30 minutes so the gluten relaxes. This prevents shrinkage and spreading in the oven.
- Roll and cut:
- Roll dough to 1/4-inch thickness on a floured surface and cut shapes using a graduation cap or square cutter. If the dough gets too warm, pop it back in the fridge for 5 minutes.
- Bake with intention:
- Place on parchment paper and bake at 350°F for 8 to 10 minutes until edges just turn golden. Watch them carefully because the difference between perfect and overbaked is sometimes just one minute.
- Make the royal icing:
- Beat egg whites or meringue powder mixture until foamy, then gradually add powdered sugar while beating. Keep going until stiff, glossy peaks form, about 5 minutes of steady beating.
- Tint and adjust:
- Divide icing and color most black and a small portion yellow using gel food coloring. Add water by the teaspoon for flooding consistency, more sugar for piping.
- Outline and flood:
- Using black icing, outline each cookie cap, then flood the interior with thinned icing and use a toothpick to spread it to the edges. Let this set for 30 to 60 minutes until completely firm.
- Add the yellow details:
- Pipe a small yellow tassel and button on each cap using a small piping bag. Place a candy piece at the tassel's end while icing is still soft.
- Let them dry:
- Wait several hours or overnight for the icing to fully harden before packaging or serving. Patience here means cookies that won't smudge or crack.
 Save
Save The moment that stuck with me wasn't the decorating itself, but afterward, when I realized these cookies had become little edible memories of someone's achievement. They weren't just dessert anymore; they were proof that you cared enough to try something new.
Royal Icing Consistency Matters
Getting the icing consistency right feels like learning a language at first. For flooding, it should drip off your spoon but still hold a slight peak; for piping delicate details like tassels, it needs to be thicker so it doesn't spread into a puddle. I made the mistake of using one consistency for everything my first time, and the yellow tassels turned into yellow smears. After that, I learned to keep two separate bowls going, which changed everything.
Making Ahead and Storage
These cookies actually improve when you plan ahead, which is a rare gift in baking. You can bake the cookies up to 2 days before and store them in an airtight container, then decorate them fresh the day before serving. If you're decorating the day of an event, know that royal icing needs at least 6 hours to fully set, so start early in the morning and trust the process.
Decoration Shortcuts and Tricks
Not everyone wants to make royal icing from scratch, and that's okay—store-bought versions work beautifully and take the pressure off. You could also skip the piped details entirely and just stick a small ribbon or candy on top of the black base. The beauty of these cookies is that they're forgiving; they still look celebratory even when your piping skills aren't perfect.
- If gel food coloring stains your hands, a quick wash with dish soap and cold water removes it faster than you'd expect.
- Keep toothpicks nearby while decorating to fix any icing drips or uneven edges before they dry.
- Let each cookie dry on a flat surface, not on a cooling rack, so icing doesn't crack or run underneath.
 Save
Save These cookies exist to mark moments that matter, and every time you make them, you're saying something important without needing words. Bake them, decorate them, and share them with people who deserve celebrating.
Recipe FAQs
- → How do I achieve a crisp texture for the cookies?
Ensure the dough is properly chilled before rolling to prevent spreading and bake until edges turn golden for a crisp finish.
- → What is the best way to get smooth royal icing?
Beat the egg whites and powdered sugar until stiff, glossy peaks form to create a smooth, pipeable icing.
- → Can I use natural food coloring alternatives?
Yes, natural colorings can replace gel colors and still provide vibrant black and yellow hues for decoration.
- → How long should icing dry before packaging?
Allow the decorated cookies to dry fully for several hours or overnight to ensure the icing sets completely.
- → Are there tools to help with detailed icing work?
Using piping bags with small round tips and toothpicks helps create neat outlines and precise tassel details.